Let’s discuss the method to prevent a user from using all hard disk space in windows using the inbuilt features that will allow you to implement this. So have a look at complete guide discussed below to proceed.
 Hard disk is the storage for the computer or the laptop devices in which the user could be able to store their data, install the operating system etc. This storage space is not always same on each of the different computing device and you could be able to see up to 2 TB storage space for the hard disk. For those who are using the computer device with only 125-320 GB storage hard disk, they might be very less in the space. It is to be noted that on fully filling the storage space the performance and the quality of the computer device running go on decreasing, the cache or the data from the various apps is not stored properly. To make sure that only a dedicated amount of hard disk space is filled you can apply the limits to its space. By doing that you will not have to worry about filling your HDD space with any media and the certain amount of space will always be free. The same thing could even be used for making sure that you use only the limited storage space in HDD. Here in this article, we have written about the method through which you could be able to set the limit to the hard disk space on your device or the windows and hence prevent the user from using all of the hard disk space. If you are interested to know about the method then please be on this page as we have explained the method. Read up to the end of the page so as to get about the exact method!
How to Prevent a User from Using all Hard Disk space in Windows
The method is quite simple and easy and you just need to follow the simple step by step guide discussed below to proceed.
Steps to Prevent a user from using all hard disk space in windows:
#1 The disk space or the hard disk space could be prevented from all usage through making the partition quotas. Disk quota space saves from usage hence you can thereby prevent the usage of this space on your hard disk. Here in this method, we will be describing you about the way to make the quota for your disk partitions.
#2 Startup with the method right-click on the disk partition or the drive on which you wish to create the disk quota. After the right-click, there will be a list menu that would appear on the screen, just select the properties option from there. Remember that you should use this step only on the selected drive or the partition and this method won’t work on the whole computer disk space.
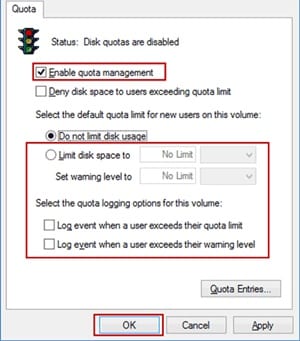
#3 Properties window will appear on the screen and from there you have to go and tap on the “Quota” tab and click the button “Show Quota Settings.” This is really easy to look at the options as described so just go ahead with the step. You will now reach the place from where you could be able to create the disk quota. Simply select the checkbox “Enable quota management” for heading to the advanced section.
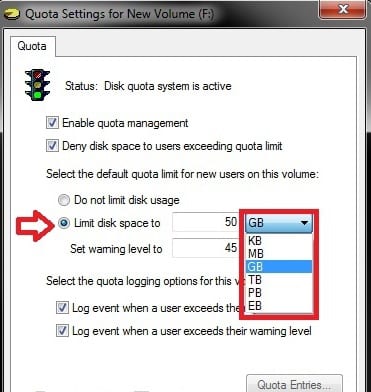
#4 From the advanced panel choose and select the “Limit disk space to” option and after that put in the limit for the disk space through which you could be able to use. You have the option to set the warning limit for the disk space where the user will get the warning message if the space filling reaches the limit.
#5 Save the changes you have made and finalize the amount of the disk space available for usage. You could be able to use the set amount of disk space and you will not be able to exceed that. But this does not mean that you will not be able to use the rest of your disk space. Simply delete the quote from the quota entries window and you will actually revert the whole method!
Finally, you are at the end of this article where you have got to know about the whole information for the method to prevent the users from using the all hard disk space. This method sets the limit to the usage of the full hard disk space and hence you have not to worry about the space next time. Hopefully, you would have liked the information of this post, please tend to share it with others if you really liked it. Please share your comments and the suggestions with us regarding the date of this post, you know that you can use the comments section for the purpose. At last nevertheless thanks for reading this post!


